Problem
Marketing teams often spend hours gathering fragmented data, aligning audience segments, and reconciling conflicting insights before a campaign can launch. The manual back‑and‑forth between Adobe Experience Cloud dashboards and internal data stores creates bottlenecks that delay creative approvals and media buys. When insights are stale or incomplete, targeting precision suffers, leading to wasted spend and missed revenue.
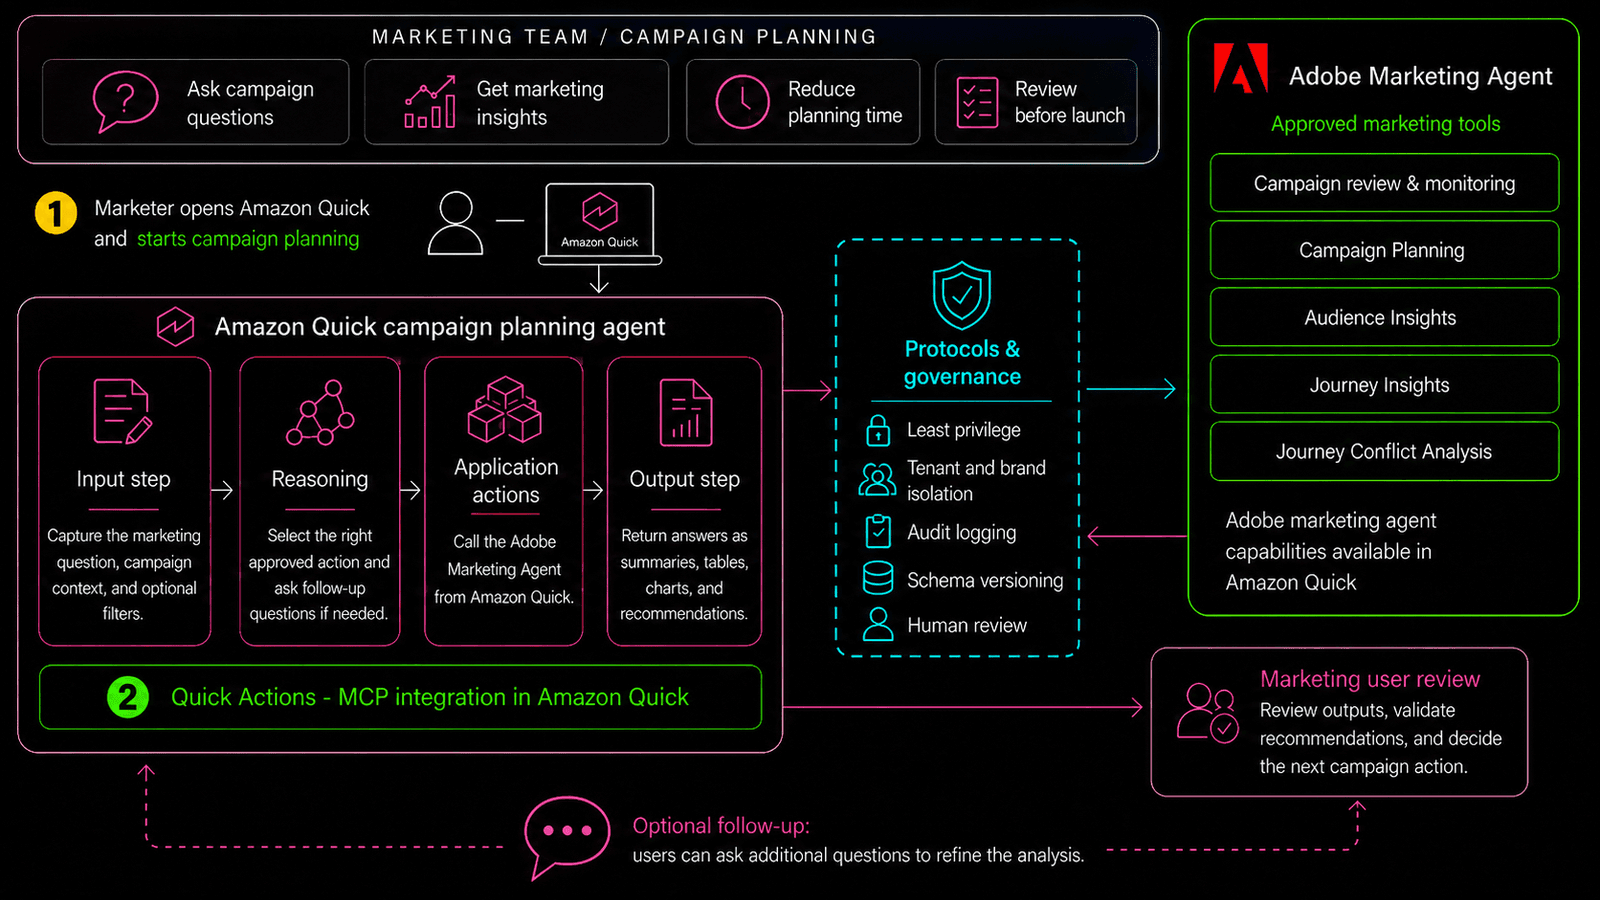
What if a single AI‑driven agent could pull the latest audience rankings, loyalty segment summaries, journey usage stats, and conflict recommendations directly into your workflow? Adobe Marketing Agent for Amazon Quick promises exactly that, but many teams are unsure how to turn the promise into a repeatable process.
Prerequisites
- Access to an Amazon Quick workspace with Model Context Protocol (MCP) enabled.
- An active Adobe Experience Cloud account with permissions to read marketing data.
- Basic familiarity with JSON‑based API calls and the Quick console.
- Network connectivity that allows your Quick instance to reach Adobe’s authentication endpoint.
If any of these items are missing, set them up before proceeding. The guide assumes you have read‑only access to the Adobe Marketing data you need; write permissions are not required for the insights covered here.
Step‑by‑Step Workflow
- Enable the Model Context Protocol (MCP) in Amazon Quick. Open the Quick console, navigate to Settings → Integrations**, and toggle the MCP switch. Save the configuration. This step activates the communication channel that the Adobe Marketing Agent uses to receive prompts and return structured insights.
- Register Adobe Marketing Agent as a model. In the Quick console’s Model Catalog**, click Add Model. Choose Adobe Marketing Agent from the marketplace list, then confirm the registration. The system will create a placeholder endpoint that will later accept your authentication token.
- Authenticate with Adobe. Generate an OAuth access token from the Adobe Developer Console. Copy the token, then return to Quick’s Credentials tab. Paste the token into the Adobe field and click Validate. Successful validation confirms that Quick can query Adobe’s data services on your behalf.
- Define the insight request payload. Prepare a JSON payload that specifies the type of insight you need. For example, to retrieve audience rankings, use:
{"insightType":"audienceRankings","parameters":{"dateRange":"last30Days"}}Replace theinsightTypevalue withloyaltySegmentSummaries,journeyUsage, orconflictRecommendationsfor other data points. The AWS blog example shows these four insight categories as the core outputs of the agent. - Send the request via MCP. In the Quick console’s Agent Playground**, paste the JSON payload and select the Adobe Marketing Agent model you registered. Click Run. Quick forwards the request to Adobe, which processes it and returns a structured response.
- Parse the returned data. The response arrives as a JSON object. For audience rankings, you’ll see an array of segment IDs with score values. Loyalty segment summaries include churn probability and average spend. Journey usage lists the most traversed paths, and conflict recommendations flag overlapping audience definitions. Export the JSON to CSV or feed it directly into your campaign planning spreadsheet.
- Integrate insights into your campaign template. Map the returned fields to the corresponding columns in your campaign brief. For example, assign the top‑ranked audience segment to the primary targeting bucket, and use conflict recommendations to adjust exclusion rules.
- Automate the sequence. Create a Quick workflow that repeats steps 4‑7 on a schedule (e.g., daily at 02:00 UTC). Use Quick’s built‑in scheduler to trigger the agent, store the output in an S3 bucket, and notify the marketing ops Slack channel with a summary link.
- Validate and iterate. After the first automated run, compare the agent’s suggestions with your historical performance data. If the loyalty segment scores align with higher conversion rates, keep the configuration. If conflict recommendations seem overly aggressive, adjust the
parametersblock to narrow the conflict definition.
Pro Tips
- Cache the OAuth token for up to 24 hours to avoid hitting Adobe’s rate limits during frequent runs.
- When requesting journey usage, limit the
dateRangeto the most recent week to keep the payload small and response fast. - Combine audience rankings with your own CRM export for a richer view; Quick can join the two datasets on segment ID.
- Use Quick’s Alert feature to flag any conflict recommendation that exceeds a predefined severity threshold.
- Document the exact JSON payloads you use for each insight type; version‑control them alongside your campaign playbooks.
Explore related AI topics
AI Tools • AI Agents • AI Automation • AI Tools for Marketing